In this article, I’m gonna be showing you how to read dobro tablature or any of my tabs for a 6-string lap-style type instrument (weissenborn, lap steel…).
Click here to access the following tabs informations:
General info
1. Tempo

This is the tempo of the tune in beats per minute and you’ll see that on the first page of each of my tabs.
In this example, the tempo is 100 beats per minute.
2. Strings

Each line represents a string. There are 6 lines and you read from the 6th string on the bottom line (which is also the bottom string) to the 1st string on the top line.
3. Tuning
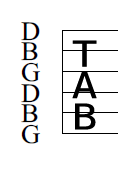
This indicates the tuning with the pitch of each open string next to the corresponding line. You should read this from the 6th string (on the bottom line) to the 1st string (on the top line). So here, GBDGBD from the thickest to the thinnest string.
4. Measure

Also called a bar, each measure is defined by a vertical line.
5. Measure numbers

The number on top of each first left measure indicates the measure number and is a visual landmark so that you know where you are in the song. In this example, on the left you read the 4th measure of the tab.
6. Time signature
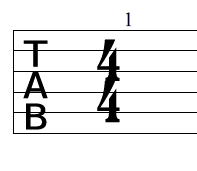
Usually appears in the first measure of the tab.
The top number indicates the number of beats and the bottom number the value of each beat. In this example, we are in 4/4 time.
The most common time signatures are:
4/4 : 4 beats within the bar with each beat being a quarter note (so 4 quarter notes within the bar, you count: 1, 2, 3, 4)
3/4: 3 beats within the bar with each beat being a quarter note (so 3 quarter notes within the bar, you count: 1, 2, 3)
6/8: 6 beats within the bar with each beat being a eighth note (so 6 eighth notes within the bar, you count 1, 2, 3, 1, 2, 3)
12/8: 12 beats within the bar with each beat being a eighth note (so 12 eighth notes within the bar, you count 1, 2, 3, 1, 2, 3, 1, 2, 3, 1, 2, 3)
7. Eighth note triplet feel
Sometimes, you see this eighth note triplet feel sign on top of the first measure:

That means you count the eighth notes like you would count triplets: 1 and a, 2 and a, 3 and a, 4 and a, BUT… you omit the ‘and’ so it becomes: 1…a, 2…a, 3…a, 4…a, which makes those 8th notes swing!
If that’s still confusing, the best way to understand a eighth note triplet feel is to HEAR it so feel free to check out some of my songs arrangements where i play with a eighth note triplet feel: for example, this one for dobro, this one for weissenborn, or any of my western swing tunes.
8. Chord name
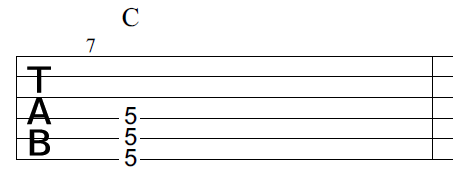
This letter on top of the bar above the stacked notes indicates the chord that is either played or implied.
Here the chord is a C major.
Navigations markers
You will sometimes see some of the following symbols in my tabs and they are used as navigation markers to prevent writing out extra measures and thus (hopefully) make the music easier to read.
1. Repeat sign
repeat from the previous repeat sign facing the other way:
or if you don’t see that sign, repeat from the beginning of the tab.
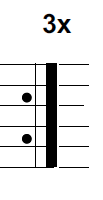
If the passage is to be repeated several times, then there is this sign on top of the measure which indicates how many times you repeat:
You repeat the passage 3 times in this example.
2. Alternate endings
Used in conjunction with the repeat sign, these numbered brackets indicate alternate endings. In this example, you would play the bracketed section with the “1.” on top of it the first time, then on the repeat you skip the “1.” section and jump to the “2.” section.
3. Segno
This symbol is used in conjunction with the D.S. sign and indicates a section that is to be repeated once you see the “D.S.” sign.
4. Dal Segno (D.S.)
means “Dal Segno” in italian and it instructs you to repeat everything starting from the segno symbol in your tab.
5. Da Capo (D.C.)
means “Da Capo” in italian and it instructs you to repeat everything from the beginning.
6. Coda
A coda is used to exit from a repeated section and leads to the ending of the tune most of the time (but not always).
This symbol is used in conjunction with the “Da Coda” instruction and can be used in conjunction with the “D.S. al Coda” or “D.C. al Coda” sign as well.
7. D.S. al Coda
This is a variant of the “D.S.” sign, you repeat everything from the segno symbol until you see the “Da Coda” instruction, then you jump to the “Coda” symbol.
8. D.C. al Coda
This is a variant of the “D.C.” sign, you repeat everything from the beginning until you see the “Da Coda” instruction, then you jump to the “Coda” symbol.
9. Da Coda
If there is a “D.S. al Coda” or “D.C. al Coda” sign in the tab then you will jump to the coda only after reaching the “D.S. al Coda” or “D.C. al Coda” sign first. if there is no “D.S. al Coda” or “D.C. al Coda” sign in the tab, then you jump to the coda whenever you reach the “Da Coda” sign on the second repeat.
10. Double coda
Same as the coda symbol but used when you need one more coda. You’ll then also have the signs “Da Double Coda”, “D.S. al Double Coda” etc.
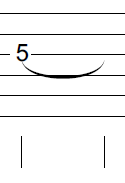
A number on a line represents the fretted note on the corresponding string (line).
Here you play the 5th fret 3rd string. Remember that with a steel guitar instrument, you should place your bar exactly above the fret.
If you play multiple notes at the same time, you would have them lined up vertically like this:
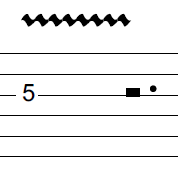
2. Vibrato
Put some vibrato on the note by moving your bar back and forth from left to right.
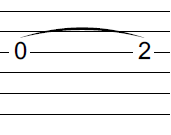
3. Hammer-on
You pick the first note and hammer-on to the second with your bar.
In this example, you hammer-on from 0 to 2 on the 3rd string.
A hammer-on always goes to a note which is higher in pitch.
For steel guitar instruments, you can only hammer-on from an open string.
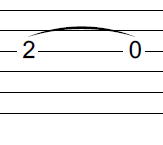
4. Puff-off
You pick the first note and pull-off to the second with your bar.
In this example, you pull-off from 2 to 0 on the 3rd string.
A pull-off always goes to a note which is lower in pitch.
For steel guitar instruments, you can only pull-off on to an open string.
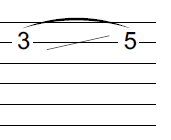
5. Slide up
Pick the first note and slide up to the second.
In this example, you slide up from 3 to 5 on the 2nd string.
You can do the same with multiple notes.
You can also slide up without targeting a note like this:
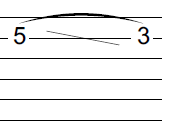
6. Slide down
Pick the first note and slide down to the second.
In this example, you slide down from 5 to 3.
You can do the same with multiple notes.
You can also slide down without targeting a note like this:
7. Slide from below
Same as a slide up but the note you’re sliding from is not explicit.
8. Slide from above
Same as a slide down but the note you’re sliding from is not explicit.
9. Quick slide
Very quick slide from one note to another on the beat. Here a quick slide from 3 to 5 on the 2nd string.
You can hear those quick slides on lots of my
songs arrangements.
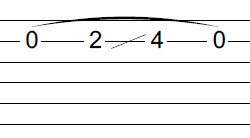
10. Combination of slides, hammer-ons, pull-offs
You can combine slides, hammer-ons and pull-offs.
For example:
Hammer-on from 0 to 2, slide up to 4, pull-off to 0. Only the first note is picked.
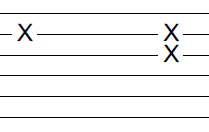
11. Mute
Here you mute the string with your left hand and pluck it with your right.
Can apply to multiple notes as you can see on the right.
12. Harmonic
Touch lightly the 12th fret 2nd string with your left hand finger tip or side and then pick the note with your right hand while removing your left hand finger at the same time.
Right hand
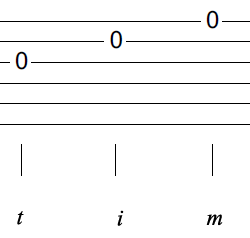
1. Thumb (t), index (i) and middle (m) fingers
Pick the first note with your thumb (t), the second with your index (i), and the third with your middle (m).
Note: I’m using my thumb, index and middle only for my arrangements but you could use your ring and pinky as well.
2. Pinch
Pinch the strings with the written right hand fingering.
The right hand finger symbols are stacked in the same order as the notes from the bottom to the top.
Here you pinch strings 3, 2, 1 with thumb, index and middle.
3. Roll
Roll the strings (ie. quickly pick one at a time) in the order of the written right hand fingering from the bottom to the top.
Here you roll strings 3, 2, 1 with thumb, index and middle.
4. Strum
Strum the strings with your thumb, like you would with a regular guitar pick.
Here you strum all the open strings with your thumb.
Rake the strings with your thumb.
In this example, you would tilt your bar up on the 5th fret 1st string and mute all the other strings with your ring and pinky, then rake all the strings.
Rhythm
Here are the basics of rhythm notation in 4/4. Once you get those, you can apply it to other time signatures.
1. Whole note
Hold the note for 4 beats (in 4/4 time). There is no rhythmic symbol under the note as opposed to all the other note length symbols (half note, quarter note…)
2. Half note
The vertical line means you hold the note for 2 beats (in 4/4 time).
it is half the duration of a whole note (so two half notes = one whole note)
3. Quarter note
This vertical line is longer than the half note vertical line and means you hold the note for 1 beat (in 4/4 time).
It is half the duration of a half note (so two quarter notes = one half note and four quarter notes = one whole note).
In 4/4 time, you count each quarter note “1 2 3 4”.
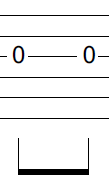
4. Eighth note
This is a eighth note and is half the value of a quarter note (so two eighth notes = one quarter note)
If you have two eighth notes, you join them with a horizontal line like this:
In 4/4 time, you count each eighth note “1 and 2 and 3 and 4 and”.
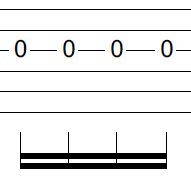
5. Sixteenth note
This is a sixteenth note and is half the value of a eighth note (so two sixteenth notes = one eighth note and four sixteenth notes = one quarter note)
If you have two or more sixteenth notes, you join them with a double horizontal line like this:
In 4/4 time, you count each sixteenth note “1 e & a 2 e & a 3 e & a 4 e & a”.
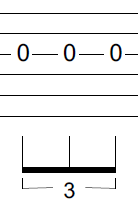
6. Triplets
These are eighth note triplets ie. 3 eighth notes in the space of one beat.
You count those “1 2 3” (or “trip-a-let”).
You can also have quarter note triplets, sixteenth note triplets…
7. Dotted half note
The point next to the vertical line means you increase the duration of the half note by half of its original value.
So in this example, you hold the note for 3 beats in 4/4 time.
8. Dotted quarter note
Longer vertical line (quarter note) with a dot next to it.
Increases the duration of the quarter note by half of its original value.
So in this example, you hold the note for 1 beat and a half in 4/4 time.
9. Dotted eighth note
Increases the duration of the eighth note by half of its original value.
So you hold the note for the length of an eighth note plus a sixteenth note.
10. Whole rest
You don’t play anything (rest) for the length of a whole note.
11. Half rest
You don’t play anything (rest) for the length of a half note.
12. Quarter rest

You don’t play anything (rest) for the length of a quarter note.
13. Eighth rest

You don’t play anything (rest) for the length of a eighth note.
14. Sixteenth rest
You don’t play anything (rest) for the length of a sixteenth note.
15. Tie
A tie connects two notes of the same pitch but you only play the first one and hold it for the duration of both notes.
Here you play the 5th fret 3rd string and hold the note for 2 beats (two quarter notes).
![]()










![]()
